Showing posts with label snacks. Show all posts

Saturday, December 3, 2011

Cinnamon and Sugar Pretzels

These are not a new concept. There's a ton of recipes out there for them. But they're fun, easy, and a nice sweet crunchy treat. Plus, I almost always have pretzels on hand so it makes a quick & fun treat to take around. And hence, they must have a home on my blog. :)

16 oz bag of pretzels (usually small twists, but big ones are fun, too)
2/3 cup canola oil
1/2 cup sugar
2 tsp cinnamon

In a small bowl, mix oil, cinnamon, and sugar. Place pretzels in large bowl and pour mixture over top, stirring to coat evenly. Pour onto a cookie sheet and bake at 300 for 10 minutes. Remove and stir and cook an additional 10 minutes. Remove and stir again, then cook an additional 10 minutes. So there is 30 minutes total cooking time. Allow to cool, then store in a sealed container. Mine usually cool & go straight into little holiday cellophane bags for neighbors. :)

Note: when I made these to post, I was out of twisty pretzels and only had the snaps. I prefer to the twisty ones. The square ones are a lot of pretzel and (to me) didn't taste quite as good. I thought they had a slight burnt taste to them because there's so much more pretzel to them. They were okay, but the others have turned out better for me. So I prefer the twisty ones to the squares. Just my opinion.

Wednesday, September 8, 2010

Quickie BBQ Chicken Pizza

I realize this is hardly a recipe. But we've enjoyed making them so much I figured I might as well post them on the blog.

This is a great recipe to use left over chicken. Plus, it is a nice for a quick lunch for the kids or a snack after school. I think they'd even be okay for a casual appetizer with friends.

Chicken, cooked and shredded
BBQ Sauce
Grated cheese
Tortillas (these were the small size)

Cook chicken. Shred it. Pour BBQ sauce over it until it has the desired amount. Place tortillas on a rack and place under HI broil for 1 minute (or a little less) on each side. This helps them to dry out a little bit so the chicken doesn't make them dough.

Remove from oven and spread chicken over the tortilla. Sprinkle cheese over top.Broil on HI for about 2 minutes or until cheese is bubbly and entirely melted.
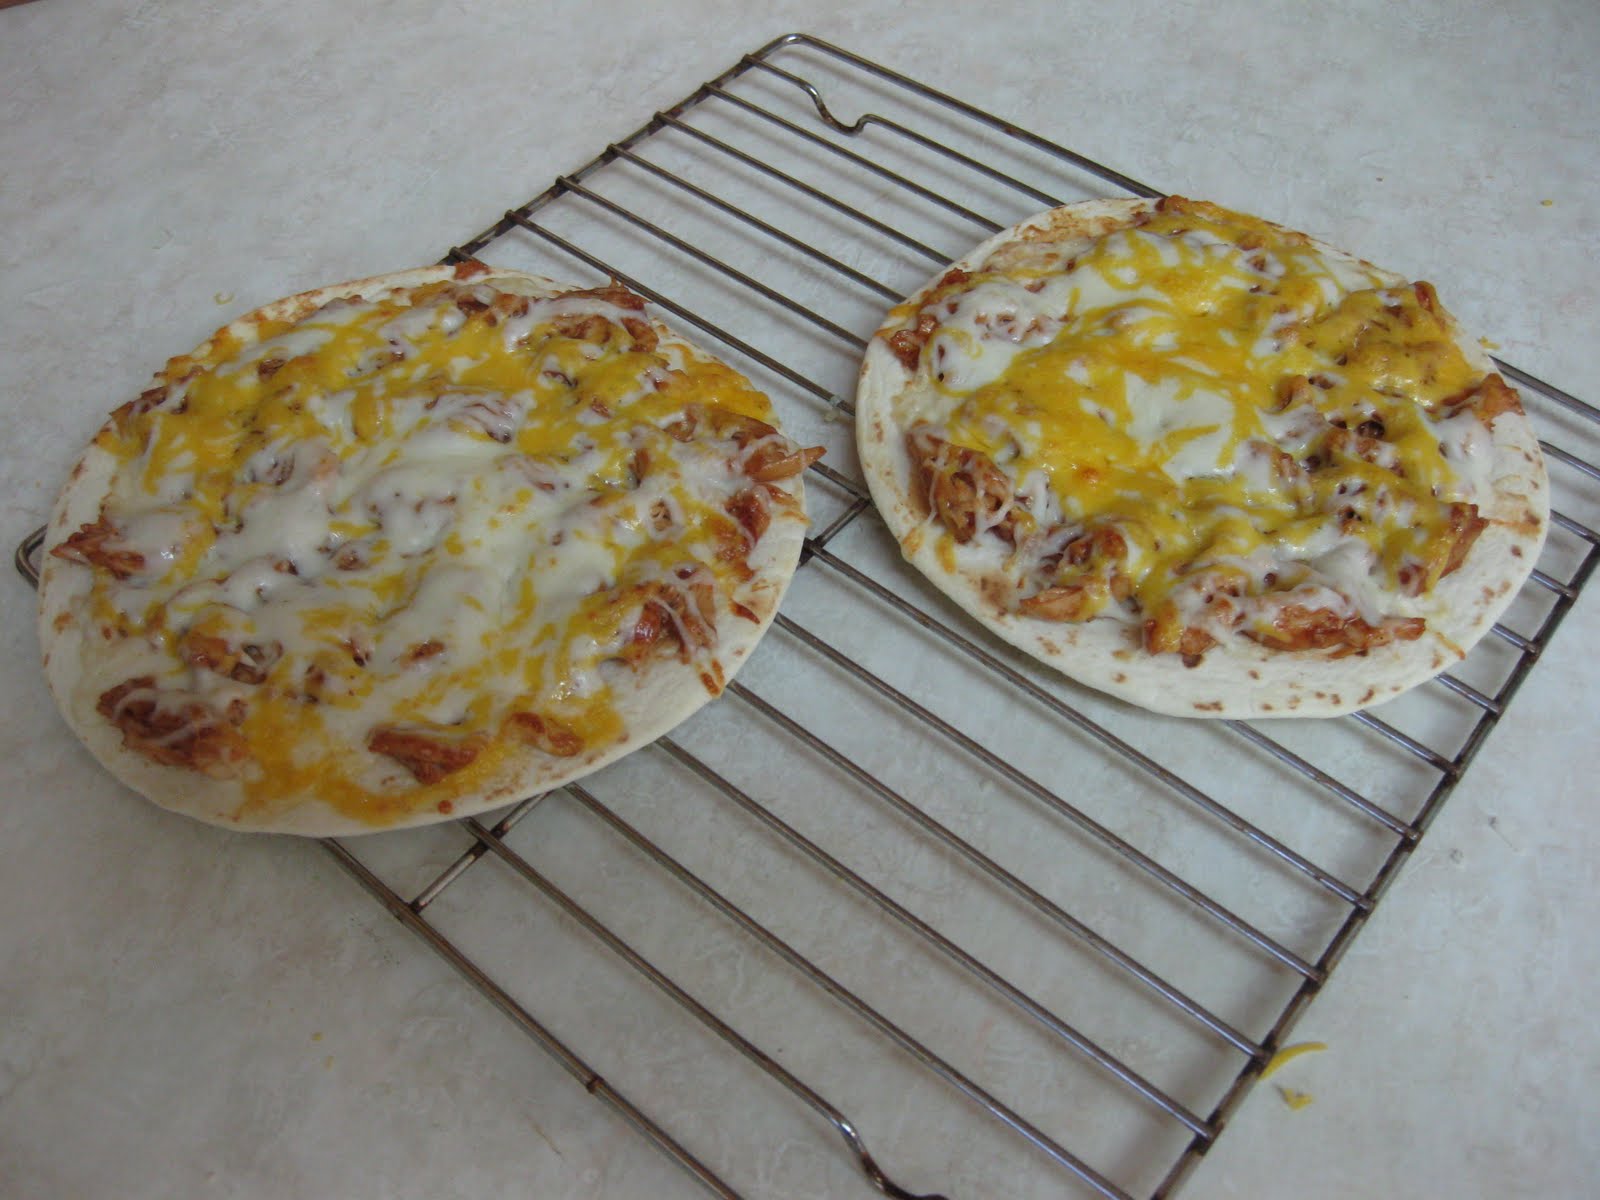
Cut into triangles and serve!

Thursday, June 10, 2010

Pioneer Woman's Homemade Chicken Strips

This is a "copycat recipe" for sure. I love Pioneer Woman's recipes and have made many of them. I haven't posted all of the ones I've used, but I use this blog as my portable recipe box..... So this recipe must be on here! They were so good. So easy. And a super hit!

1 pkg chicken strips (I used tenderloins and cut them into strips)
Buttermilk (can use egg, milk, cream)
1 1/2 cup flour
2 1/2 tsp Lawry's seasoning salt
Vegetable oil

In a frying pan or skillet, pour enough oil so there is about 1 inch of oil. Preheat on medium heat.
If using tenders or strips, place them in a bowl with desired liquid (buttermilk, cream, milk, or egg). If using tenderloins or breasts, cut them into thin strips and proceed in the same step. Allow chicken to sit in liquid for at least 20 minutes. I didn't have buttermilk on hand (which is what Pioneer Woman suggests), but the cream worked well for me, too.
In a bowl, mix flour and seasoning. Carefully drizzle about 1/4+ cup of liquid, while gently stirring with a fork. This will create little crumbles of crunchy goodness later.
When oil is sufficiently hot, take a pieces at a time out of the liquid and roll chicken around in the flour mixture.Place carefully into oil. Cook until brown on each side. They don't take long at all.As each strip gets done, place on paper towl to cool.

Serve as an appetizer, main dish, on salad, in a wrap, or just for a snack!

Tuesday, May 11, 2010

Cookie Dough Topping

In efforts to find something sweet that didn't contain eggs, I remembered my Carmelita recipe. (I am nursing my baby and for some reason or another, if I eat anything with egg in it, he vomits.) I made a batch of Carmelitas without chocolate and fell in love. I decided to make another batch a few days later but kept eating the "dough." After keeping it in the fridge, it solidified into beautiful little crumbles. It was destined to become cookie dough topping for ice cream! And it was a match made in heaven! The great thing about this cookie dough is that it doesn't contain egg and it can be versatile for what you'd like to add to it. Mini chocolate chips, raisins, dash of cinnamon, and/or nuts.

Full batch (makes quite a bit)
Half batch in italics

1 1/2 cups oatmeal - 3/4 cup
1 1/2 cups flour - 3/4 cup
1 1/4 cups brown sugar - 1/2 cup + 2 Tbsp
3/4 tsp soda - 1/4 tsp + 1/8 tsp
1/4 tsp salt - 1/8 tsp
3/4 tsp vanilla - 1/4 tsp + 1/8 tsp
2 cubes butter (no substitutes) - 1 cube

Add all dry ingredients and mix with spoon. Add vanilla and butter. Mix well. I do this with a pair of plastic gloves (meant for handling food). It just works better. (A half batch is pictured.)Put in a ziploc bag and let it refrigerate for several hours. You can separate this into different bowls and put in the extras (chocolate chips, etc) so that you have different choices. But plain is really good, too.
Crumble it up and put it on your desired flavor of ice cream!Super simple but it adds such great taste to your ice cream. I like it plain or on ice cream or on yogurt. It is loaded with butter (but what great tasting recipe isn't?) but it's not like you're sitting and eating the whole batch. ;) Not that I have done that or anything! ;)
Keep any remaining topping (if there is any!) stored in ziploc bag(s) in the fridge.

Wednesday, March 31, 2010

Almost Cracker Jacks

from my mom
NOTE: Recipe cannot be doubled 

One large plastic bowl
4 qt air-popped yellow popcorn (or microwave popcorn or movie popcorn from Lee's)
1/2 cup salted butter
1/4 cup Karo syrup 
1 cup brown sugar (for best flavor, use 2/3 cup golden brown sugar and 1/3 cup dark brown sugar) 
1/8 to 1/4 tsp salt (depending on what kind of popcorn you used) 
1 tsp vanilla 

Put popped popcorn in large plastic bowl. Set aside. In a medium-sized bowl, microwave butter, Karo syrup, and brown sugar for 2 minutes. Remove and stir. Microwave an additional 2 minutes. Make sure it is bubbly and the sugar has been well-dissolved. If not, do a minute or more until it is bubbly and mostly smooth. Remove and stir. Add salt. Add vanilla. Stir. It will bubble up furiously for a minute.  Pour over popcorn in bowl. Using long handled spoon or silicone spatula, stir to coat popcorn somewhat evenly. Microwave for 1 ½ minutes. Stirring every 30 seconds. Remove and stir well. Microwave an additional 1 ½ minutes, stirring every 30 seconds. Stir well. Pour onto parchment lined cookie sheet. (Note: parchment not pictured. Sorry!) Allow to cool, then break up into chunks and enjoy! IF there is any remaining, put in a ziploc bag.
Note: Either microwave popcorn or air pop popcorn works in this recipe as long as the air popped popcorn is yellow popcorn and not white. White has too fragile of a flake and shrivels. Believe me, I have tried and it doesn't turn out nearly so good. Lee's is a local grocery store in my area that sells a big bag of movie popcorn for $5/bag. It was perfect for this recipe! And then we had movie popcorn AND cracker jacks to enjoy! Whatever you choose for your popcorn, hope you enjoy this recipe!

Saturday, February 27, 2010

Restaurant Style Salsa


This is totally a copy cat recipe (from The Pioneer Woman). But that's okay. You can't go wrong with any of her recipes. It was divine! And I'll be making it again soon. We polished it off in no time.... with help from the neighbors. ;)
Ingredients
1 can (28 Ounce) Whole Tomatoes With Juice
2 cans (10 Ounce) Rotel, 1 mild & 1 original (use two mild if you want it without much of a kick, but one of each was perfect for us.)
¼ cup Chopped Onion
1 clove Garlic, Minced
1 whole Jalapeno (I did mine with no seeds)
¼ teaspoons Sugar
1 teaspoon Salt (or slightly less, but not more... it gets stronger as it merries)
¼ teaspoons Ground Cumin
½ cups Cilantro
Juice of a whole lime, if small
Instructions
Chop up onion, garlic, & jalapeno. Combine whole tomatoes, Rotel, onion, jalapeno, garlic, sugar, salt, cumin, lime juice, and cilantro in food processor.
Yes, I know.... I realized very quickly I was going to have to do this in 2 batches because I have a small Cuisinart food processor. But it still worked.Pulse until you get the salsa to the consistency you want. Do a taste check with a tortilla chip and adjust as needed. I added a tiny pinch more salt.
Refrigerate salsa for at least an hour. It tastes good right away, but after it sits in the fridge, it is even better. Serve with tortilla chips.

Half Recipe:
1 can petite diced tomatoes
1 can mild rotel (or original for spicier salsa)
2 Tbsp chopped onion
1 small clove garlic, Minced
1/2 of a Jalapeno (I did mine with no seeds) -I use the other half in a different recipe
1/8 teaspoon Sugar
1/2 teaspoon Salt (or slightly less, but not more... it gets stronger as it merries)
1/8 teaspoon Ground Cumin
½ bunch of Cilantro (I'm sure this is more than 1/4 cup, but we like ours more cilantro-y)
Juice of a half of a small lime

I chop up the onion, garlic, jalapeno, cilantro all together in food processor. Add Rotel and tomatoes, lime, sugar, salt, and cumin. Pulse until desired consistency. Allow to merry for several hours.
Makes just under 4 cups.

Friday, February 26, 2010

Chocolate Dipped Peanut Butter Pretzel Bites

Disclaimer: I know I've previously posted a recipe with this same title. In practically EVERY case, I have made every recipe on this site. On occasion, I get one from someone and assume it is good. I received this recipe and it wasn't exactly as I would have liked or imagined. I have a wonderful peanut butter ball recipe (which came from my mother-in-law) that I use for making Christmas candy each year. So I put it to use and the result was fabulous. For that reason, I am reposting this as my own version.... which I of course feel is much better. The peanut butter is extremely smooth and super delicious!
Makes about 60 bites or so depending on the size you roll the balls.

Filling ingredients:
2 cups powdered sugar
1 1/2 cups peanut butter
3 tbsp softened butter (not margarine)
Waffle shaped pretzels (squares or rounds)
Melting chocolate
Directions:
Put filling ingredients in a bowl and mix until well combined and smooth. (Sorry about the picture. Had to use an old camera for it since my other one was charging!)
The result will be a semi-stiff, but still soft dough. Should not stick to your hands. If it does, add a tiny bit of powdered sugar. (Again, sorry for the bad picture.)Roll into balls. Not too big. About 3/4 of an inch or a little less. (Yeah, battery finally charged! Boy there is sure a difference.)Put between pretzels to make a sandwich.Put in freezer for about an hour or until firm.

Get chocolate ready for dipping.
Dip each "bite" only half way into the chocolate and set on wax paper to set up. Keep in fridge until ready to serve.

I think these would be fun to dip in white chocolate colored for the holidays. There are many possibilities!

Tuesday, January 19, 2010

Chex Mix

This is a repost of an older post. It just finally has a picture to go with it.

from Aunt Linda

2 cups each (6 or 7 cups total):
Rice Chex, Corn Chex, Golden Grahams ,or Wheat Chex ( I only use the Wheat if I have to)
1 cup coconut
1 cup nuts (optional)

Place in a large bowl.Mix 3/4 cup butter, 1 cup sugar, and 1 cup Karo Syrup in saucepan.Bring to a boil. Boil 3 minutes.Pour over cereal. Stir until coated.

Line a cookie sheet with wax paper. Pour cereal mixture on wax paper to cool.

Saturday, November 21, 2009

Nutter Butter Reindeer

I was going to post this on Monday, but I couldn't wait. They're too much fun!

These turned out absolutely adorable. We made them for a cub scout activity along with the Candy Corn Turkey Treats. No two reindeer or turkeys turned out the same. Each had their own little personality. I think the reindeer would be fun to take to neighbors (with kids) for Christmas treats or just make for fun as a family night activity.

Nutter Butter cookies (head)
small pretzels (antlers)
red m&m's (nose)
mini chocolate chips (eyes)
Chocolate frosting

Carefully eat the bottom part of the pretzel. Or if you'd rather use the whole pretzel, go ahead and leave it whole. If you're really careful, you can use the little round piece as a mouth under the red nose! Spread just enough frosting on top of Nutter Butter to hold the pretzel antlers in place. Use a small amount of frosting to place the chocolate chip eyes and the m&m nose in place.

These were super simple to make. Even my 6 year old and 4 year old could do it. The boys in my scout group got pretty creative with theirs, biting the pretzels into funny pieces for the antlers and putting the spare pretzel parts in crazy places. No matter the age, they all enjoyed making them as well as eating them!

Friday, November 20, 2009

Candy Corn Turkey Treats

I'll be the first to admit this isn't the cutest picture. I just couldn't get a cute one. But these little turkeys are great fun! We made these for a cub scout activity and the boys really enjoyed it. We made them along with Nutter Butter Reindeer. I'll be posting it soon.

Ritz crackers (body)
Hershey kisses (head & neck)
Chocolate frosting
Candy Corn (feathers, gobbler, & beak)

Make your frosting (or buy it). Spread a layer of chocolate over Ritz cracker. Press 5 candy corns into the top, making sure the fat part is at the top (like a feather). I prefer the darker candy corns (with the brown and orange), but the store I went to didn't have them. I think it would be fun to actually alternate the two kinds of candy corn, too. Press one Hershey kiss into the bottom part of the turkey for the body and then, with a tiny bit of frosting on the bottom, stick one more candy corn on top of the Hershey kiss to make the gobbler and beak.

Feast on a sweet treat!!!

Tuesday, July 21, 2009

Chocolate Muffins

These are way too easy. You'll almost feel guilty. But don't, they're so yummy and they have great texture. (Note: the picture is with my changes. I added cream cheese and chocolate chips. Leave it to me to make something kind of healthy not even close to healthy.)

1 pkg Rich Chocolate Cake or Devil's Food Cake Mix
1 small can pumpkin

Mix together with mixer.I used a Rich Chocolate cake mix for this batch. I think I prefer the Devil's Food.Put in muffin pan. Bake at 350 for 17 minutes. If you don't like pumpkin, don't worry. These don't taste at all like pumpkin... at all. I was surprised there was even pumpkin in them when I had them the first time. I think it might even be fun to put a small dollop of cream cheese in the middle before baking. But I'm a little obsessed with cream cheese.

Note: A white cake mix can also be used. But the chocolate ones are DELICIOUS!
Variation: I mixed together 1/2 pkg cream cheese, half of a beaten egg, and 1/4 cup sugar with a mixer. Drop by tbsp into each muffin. I tried to put mine in the middle and then sprinkle them with mini chocolate chips on top. But I think making a well in the middle of each muffin and then putting the filling in would work better. I'll have to try that next time. These take a few minutes longer to cook. And they're more like dessert than breakfast. Super rich and yummy. We liked ours with fresh raspberries. :)

Monday, July 6, 2009

Puffed Wheat Squares

from Grandma R.
These are lightly sweetened treats. Perfect for summer or an after-school snack. They make up quick and they're always gone quick, too.

7 cups puffed wheat cereal (not the already sugar coated stuff - It can be hard to find sometimes. I found my bag at Albertson's)
1 cup Karo syrup
1/2 cup brown sugar
1/2 cup butter Over medium heat, stirring almost constantly, cook mixture until it reaches threads (just before soft ball stage).
Coat puffed wheat and press into pan or cookie sheet. Let set and cut into squares.

I have a ton of memories with these squares growing up. My grandmother made them for almost every family gathering/event. The grandkids all loved them. I remember them being part of my grandmother.

Monday, June 22, 2009

Beer-Battered Onion Rings


from my brother, Denton and (allrecipes.com with our changes)

3 cups flour, divided
2 eggs, separated
1 cup Fat Tire Beer, plus more for thinning (its better, I promise)
4 Tbsp butter, melted
salt to taste (a pinch or so... we usually end up doing about 1/4 tsp, but you can start with less and add more later after you test one)
3 large Vidalia or Walla Walla onions (Vidalia are our favorite)

Put 1 cup flour into small bowl for dipping onions before the batter. In a medium bowl, beat egg yolks (saving the whites for later in a small bowl). Add in beer, butter, and salt. In a large bowl, add 2 cups flour. Slowly stir the egg mixture into the flour and mix well.  Batter is different every time I make it due to humidity and time of year etc. So sometimes it is a little thicker and sometimes it is thinner. Add more beer from the bottle until the batter resembles pancake batter. Sometimes we end up using the entire bottle. Sometimes less. But get it to a pancake batter consistency. Allow to stand for 30 minutes to an hour. Heat up deep fryer to 375.

After batter has rested, in a small bowl, beat the egg whites with hand mixer until stiff peaks form. Gently fold the egg whites into the batter.

Coat each onion ring with a dusting of flour (to help the batter stick) and then dip into batter.Using a fork, allow some of the batter to drip off a bit. Carefully dip the onion ring into the hot oil. You don't want to just plop it in there or the batter will fly off and your onion ring won't be as pretty. (But it still tastes the same.) I usually fry one or two and then taste them to see if the batter needs more salt. You don't want them salty. Just barely there for flavor. We dip the onion rings in various things so you don't want an overpowering salty flavor. So we start with 1/4 tsp and that is usually enough. Sometimes it needs a dash more, but not too often. Once you're happy with the taste, continue flouring and battering and frying until you get the amount of onion rings needed.Deep fry until rings are golden brown. Usually 3 minutes or so. I use my larger fryer (not shown) and can get about 4-5 rings at a time. And I flip them over half way.

Note: If you don't need to use all the batter, it can be refrigerated for up to 2 days. Admittedly, this makes a large batch. LARGE! But don't despair, that means more for later. Just put the onions and batter in the fridge and make some more later or the next day. It's still great. Follow same directions as above... flouring first, then batter, tap... and fry to golden. :) ENJOY! YUM!!!!

Wednesday, June 3, 2009

Monkey Bread Muffins

This is just a twist on an old favorite
and it's a fun recipe to make with your kids

1 tube of Pillsbury Flaky Layers biscuits
cinnamon/sugar mixture in a ziploc bag
melted butter and brown sugar to desired consistency
Muffin pan
Non-stick spray OR Muffin liners (optional)

Cut each biscuit into 4 pieces. Put pieces in ziploc bag and shake. (This is my kid's favorite part.) Spray muffin pan or use muffin liners (or both). Place 3 pieces into each muffin cup. Repeat. (One muffin cup will have just 2.)Using a spoon, drizzle brown sugar mixture over each muffin cup. If you want them super gooey, put more on. Bake at 350 for 15 minutes.
Naturally, they are best served warm. We like to serve these with scrambled eggs and cheese.
Note: I should have put these in muffin liners. I think they would have been less mess. If there are any left, place them in ziploc bag. When you want another one later, just pop 'em in the microwave for 20 seconds.